Isn’t the holy grail of user experience not the possibility to only logon once and never to enter credentials again? We can do that today, and with the NetScaler 11 release this is even easier than ever.
In this post we’ll be chaining products like ADFS, SharePoint, Citrix XenApp and NetScaler with technologies like SAML and Kerberos. We’ll also be using the new Unified Gateway functionality to do everything with a single external IP. I’m also assuming some basic knowledge of ADFS, IIS and NetScaler Gateway. Indeed, this is not for the faint hearted.
So what is the use case? Well, one of my customers wanted a solution to provide their users with Single Sign On (SSO) access to all of their applications. This solution would be composed of a portal site containing links to all applications (web apps, or Windows apps hosted on XenApp), and an access point consolidating various authentication methods and providing federated access. The customer has internal users, but also has employees and associates working at universities spread all over the country, who would like to login with their university account instead of an AD account of the customer.
The solution should reduce the number of helpdesk calls to reset passwords – especially for users coming from a federated partner, but also calls for getting access to applications.
Design
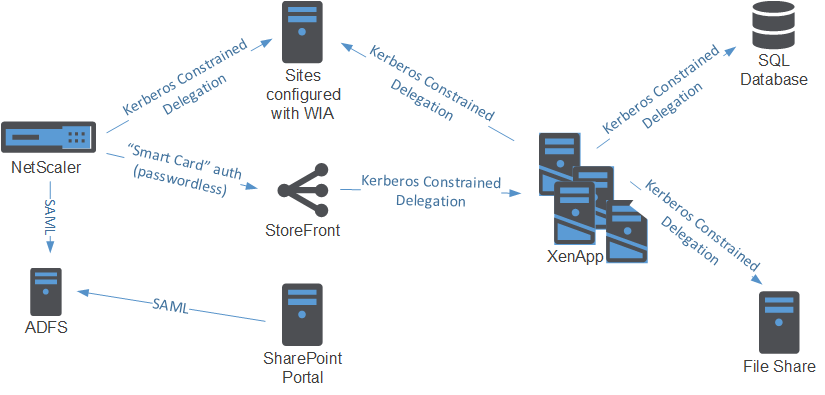
This specfic solution requires an Active Directory account for each user in the resource domain to access XenApp applications. Federated users thus also have an AD account, which we’ll lookup using the email address of the user.
Do note that this reliance on Unified Gateway requires the NetScaler Enterprise Edition. But then again, when you’re using the NetScaler to authenticate your users to web applications you should already have the Enterprise Edition for AAA functionality.
Configuration
So without further ado, I present the solution:
- Configure ADFS
- Configure NetScaler for ADFS authentication via SAML
- Configure NetScaler for Kerberos Contrained Delegation
- Configure NetScaler Unified Gateway
- Configure StoreFront for Kerberos Contrained Delegation
- Configure the XML Broker to accept Kerberos tickets
- Configure web resources to accept Kerberos tickets
Configure ADFS
First we’ll add the NetScaler as a relying partner for ADFS. To do this, you can generally follow CTX133919 – How to Configure NetScaler SAML to Work with Microsoft AD FS 2.0 IDP.
Now we’re going to make sure that we get the User Principal Name for each account that’s logging in (for both users in the resource domain as Federated users). We assume that the identity provider for the Federated users delivers his/her email address as a claim.
For these Federated users we’re going to lookup the User Principal Name using the email address of the user. We do this by adding an Issuance Transform rule of the type “Send claims using a custom rule”:
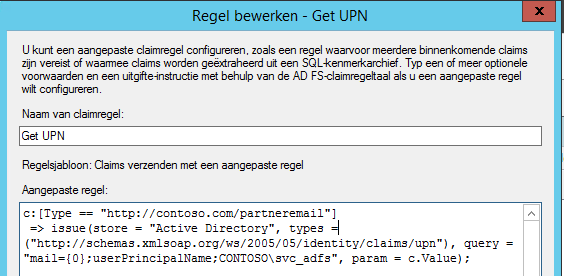
In this example the email address is of the claim type “http://contoso.com/partneremail”. We use the value of this claim to lookup the User Principal Name of the user.
Note that this rule only executes when the claim of this type is given, for users authenticating with their resource AD credentials, this rule is not hit.
Then we’re going to transfer the User Principal Name As the Name ID claim by adding another Issuance Transform rule of the type “Transform an Incoming Claim”:
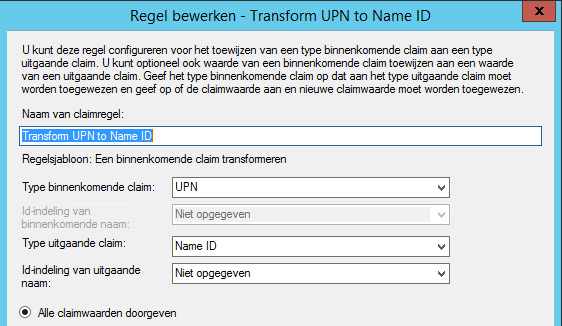
This rule is hit for all users. As you will see in the NetScaler configuration later on, we will use this Name ID claim.
Configure NetScaler for ADFS authentication via SAML
Before configuring ADFS authentication we must install at least one (but two recommended) certificate.
- we need the server certificate of the ADFS server
- we need a certificate to sign our SAML traffic (for this we need the private key). Because this certificate is only used in traffic between the NetScaler and ADFS server, this can be a self-signed certificate.
So if you haven’t installed these yet on the NetScaler, do so now.
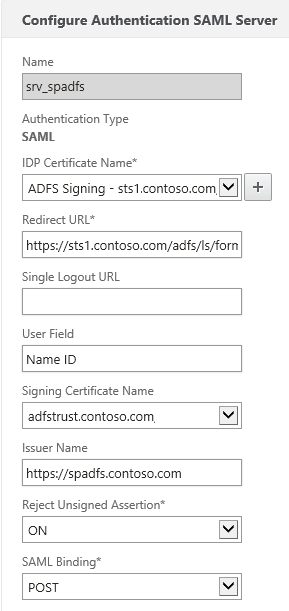 In the NetScaler, head to your Authentication Polices and add a new SAML server.
For the IDP Certificate Name, use the server certificate of the ADFS server.
For the redirect URL use https://<ADFS FQDN>/adfs/ls/formssignin.aspx
For the User Field, enter “Name ID”
For the signing certificate, use the certificate that you prepared for SAML signing
For the issuer name, you can use any arbitrary name, as long as you configure the same identifier name in ADFS. In this example I use the URL of the Unified Gateway.
Reject Unsigned Assertion you may leave on (should pose no problems if you’ve configured the certificates correctly).
For the SAML Binding, choose POST Binding.
After you’ve created the Server object, you can create a SAML auth policy. As the expression, you can use “ns_true”, as the action you select the Server object you’ve just created (srv_spadfs in this example).
We’ll use the SAML auth policy later when configuring the NS Gateway instance of the Universal Gateway.
Configure NetScaler for Kerberos Contrained Delegation
To authenticate to web servers, we’ll be using Kerberos. Because we’re only getting the UPN of the user (not the password), we’re going to depend on Kerberos Constrained Delegation. This allows the NetScaler to authenticate on behalf of the user to other servers which accept Kerberos tickets.
There are several ways to configure access to authenticate and request Kerberos tickets on NetScaler (using a keytab file, using certificates or with a user account). Here we’ll be using a user account.
First, create a user account in Active Directory to which we’ll delegate rights to access other services. Best is to create it as a service account (do not expire the password).
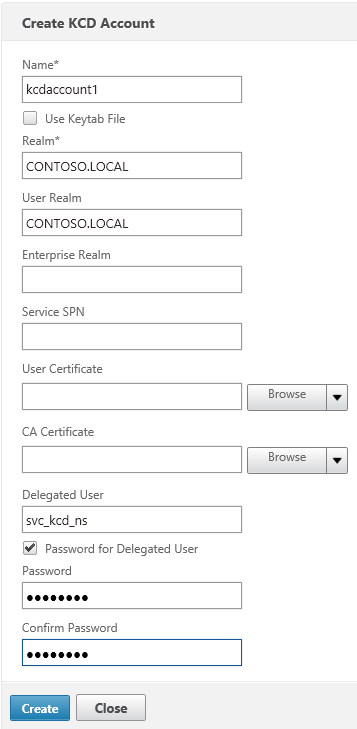 Then configure the KCD Account on the NetScaler. Under Security > AAA > KCD Accounts, add a new KCD account:
Give the account a new name (e.g. kcdaccount1). This name is only used on the NetScaler.
For the Realm, enter the Kerberos realm of the resource domain (e.g. CONTOSO.LOCAL).
For the User Realm, enter the Kerberos realm where the users reside. Because in our case all users have a user account in the resource domain, this is the same (e.g. CONTOSO.LOCAL).
For the Delegated User, enter the exact name of the AD service account you’ve previously created, and enter the password as well.
After that, we’ll create a Traffic policy which we’ll later attach to the LB vservers after which the web servers are located. Make sure SSO is turned on and you’ve selected the KCD account you’ve previously created (e.g. kcdaccount1).
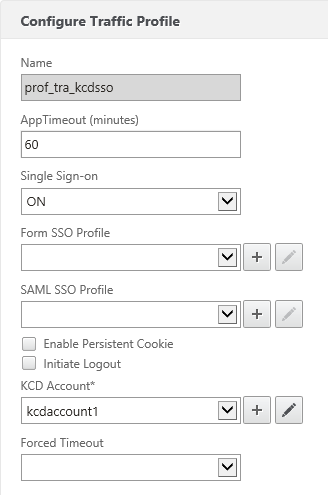
There, all set for KCD on the NetScaler!
Configure NetScaler Unified Gateway
So, one of the cool new features is the Unified Gateway. Technically speaking the Unified Gateway allows us to put the NetScaler Gateway behind a Content Switch. The Content Switch is configured with a public-facing IP and accepts all client connections. The NS Gateway is then configured with a non-adressable ip (0.0.0.0). The CS redirects traffic to the NS Gateway based on a carefully constructed CS policy.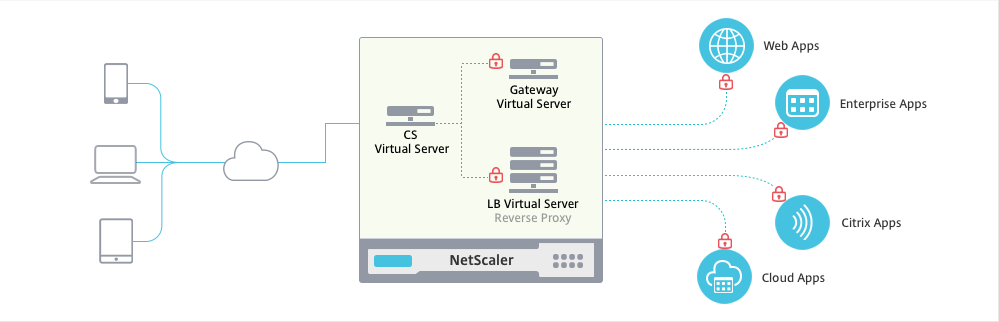 We can even use the NS Gateway auth server for authentication (even to web applications), so no AAA vServer is necessary, which means we save a public IP!
And if you configure the Content Switch with a wildcard certificate (or a SAN certificate), you can put any host behind the CS (e.g. sharepoint.contoso.com, owa.contoso.com, …) using additional CS policies.
The easiest way to setup a Unified Gateway on NetScaler is to use the built-in wizard.
When creating the Unified Gateway, do note that the Unified Gateway IP you have to enter actually is the IP of the public facing Content Switch.
As for the certificate, best to use a wildcard certificate for your public domain, or a SAN certificate containing all external URLs (though less flexible if you want to add more URLs behind it). If you’re only going to use cVPN, then a standard SSL certificate may suffice – though since I only recommend cVPN for but the simplest use cases – I strongly advise not to go with that path.
Curiously you cannot select SAML for authentication via the Wizard, for now, add something like LDAP auth. That doesn’t have to work – we’ll disable authentication later on the NG vserver.
Portal theme and applications aren’t important (unless you’re going for the cVPN route).
Once you’ve created the Unified Gateway you’ll hopefully find a new CS and a new NG vserver on your NetScaler.
Let’s configure them for our solution:
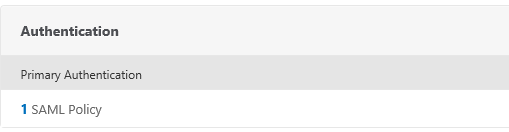
First, make sure you add the SAML auth policy you’ve previously created to the NetScaler Gateway virtual server. You do this by editing this NS Gateway. Remove any other authentication policies which might have been added with the Wizard.
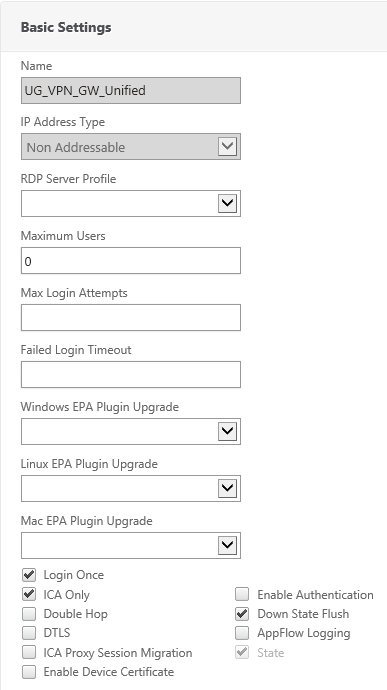 Second,
a) switch authentication off (how weird that might sound)
b) enable Login Once and
c) enable ICA Only (if you’re not going to use SSL VPN or SmartAccess policies) so you don’t consume Universal Licenses.
Add your StoreFront configuration as usual (STA servers & Session Policies).
That should be it for the NS Gateway.
Configure StoreFront for Kerberos Contrained Delegation
StoreFront will be a special case. In order to have SSO to XenApp, we’ll not be doing KCD from the NetScaler to StoreFront. Actually, we’re going to do Protocol Transition to Kerberos on the StoreFront server itself.
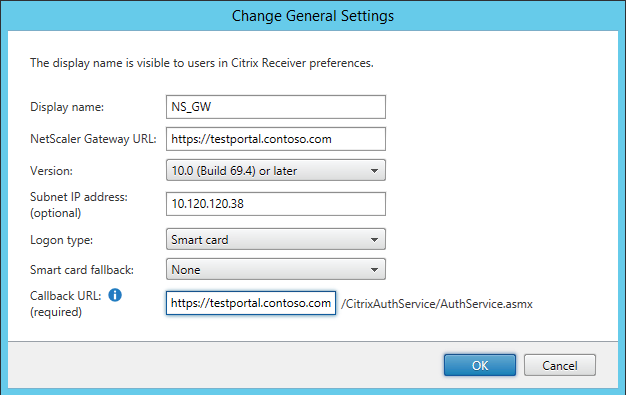
For that we’re going to (supposedly) use Smart Card authentication on the gateway. In StoreFront, add (or edit) a gateway and make sure the Logon Type is set to Smart Card. Like always, make sure that your StoreFront server can perform the callback (check that it can resolve the URL). In our environment we’re using the following settings:
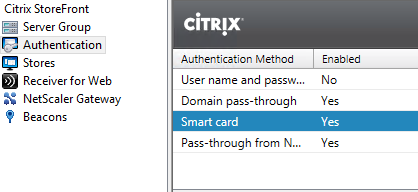
Make sure you also enable Smart Card authentication on StoreFront.
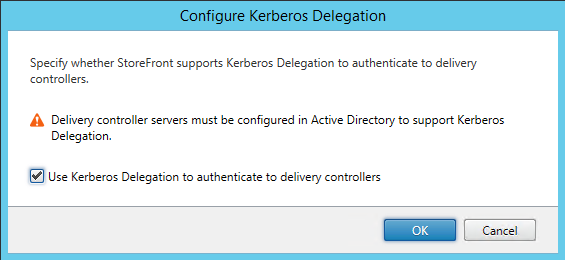
Also, on the store we are going to enable Kerberos Delegation:
Configure the XML Broker to accept Kerberos tickets
Now of course, this also requires our XML brokers to speak Kerberos. In XenApp 6.5 this is only possible if you share the XML service with IIS. IIS will then handle the authentication part (and IIS understands Kerberos).
This means that we need at least one XenApp XML broker where the XML service shares it’s port with IIS. If you haven’t chosen this option during the installation of your server, you could follow CTX125107 – How to Configure XML Service to Share Port with IIS on Windows Server 2008 to reconfigure the XML broker to share the service with IIS.
However I strongly recommend against performing the above because I’ve encountered several issues with this (like no applications returned from time to time, config gets broken when installing Rollup Packs, etc), so I advise to install new XenApp servers with the XML broker integrated with IIS, and to use them as dedicated XML brokers.
Make sure that the “CtxAdminPool” and the “CtxScriptsPool” application pools run under the LocalSystem account as per CTX130480, otherwise you also might encounter connection problems. This is necessary because we’ll delegate rights to the StoreFront computer account to perform KCD to the XML broker. By running the app pools under the LocalSystem account, we can add delegation to the HTTP service on the computer account of the XML broker.
Talking about Kerberos delegation, we must configure delegation as follows to allow SSO to XenApp:
On the StoreFront computer account(s) add delegation for:
- HTTP service of all XML brokers (also check if an HTTP SPN record exists for the service on those computers with SETSPN -L <hostname>)
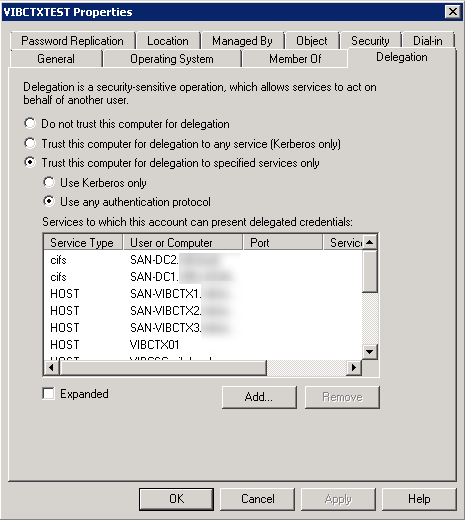
On the XML Broker computer accounts add delegation for:
- CIFS & LDAP services of all Domain Controllers
- HOST service of all XenApp servers in the farm
- HOST service of itself
- HTTP service of itself
On the XenApp computer accounts add delegation for:
- CIFS & LDAP services of all Domain Controllers
- HOST service of itself
- HTTP service of all XML brokers
Note that when using KCD, you must delegate the whole chain. That means for example that if you are using roaming profiles on a remote file server, you must also add delegation to the CIFS service of that file server on the XenApp computer accounts.
Next to all this, your XML Broker must also be configured to trust XML requests. The easiest way to do this is with the XenApp policy “Trust XML Request Sent to this broker”, which you then apply to the XML brokers.
Configure web resources to accept Kerberos tickets
When accessing web resources we will be using KCD on the NetScaler. Very important to note that NetScaler will use the server name (which you define via Load Balancing > Servers) to perform Kerberos SSO. This means that you need to add the server with the exact name of the service (which has an SPN record) you’re accessing.
For example, you’re running a website which is running in an app pool with the LocalSystem account (like the XML brokers), then:
- you need to add the server with the exact hostname of the server hosting the website
- on the service account you’re using for KCD, you need to add delegation for either HOST/<hostname> or HTTP/<hostname> on that server
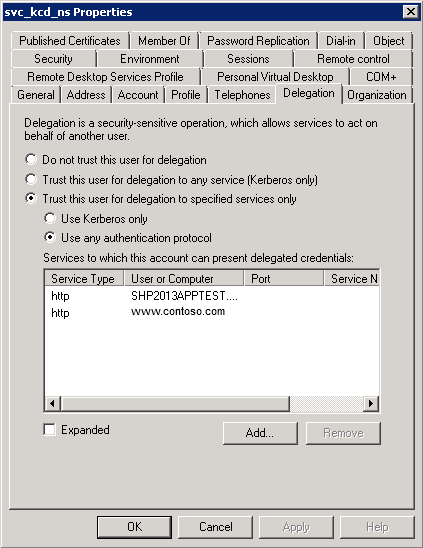
In another example, you’re running multiple websites on one host (each with their own hostname) and one of those websites you want to perform Kerberos SSO for is running under a specific user account. Then:
- you must ensure that a SPN record exists for that hostname on the user account on which it is running (e.g. if the hostname is www.contoso.com, and it’s running under the CONTOSO\svc_website account, then check if the SPN is registered by running “setspn.exe -L CONTOSO\svc_website” – this will list all SPNs for that account – if not, add the SPN with “setspn.exe -a HTTP/www.contoso.com CONTOSO\svc_website”)
- add the server on the NetScaler with the hostname of the website. This could pose a problem when you’re adding servers by IP on the NetScaler, because NS only allows one server with that same IP address. A workaround is to add the server by DNS name. (if the NS can’t resolve it then, add an A record on the NS DNS).
- on the service account you’re using for KCD, you need to add delegation for HTTP/<hostname> on <user account> (e.g. HTTP/www.contoso.com on CONTOSO\svc_website)
Then, add the traffic policy you’ve previously created on the LB vserver, that will ensure Kerberos SSO will be performed.
Inspiration / References
- OpenID Connect/oAuth 2.0: Integration with XenApp through Unified Gateway
- Troubleshooting Smart Card SSO with Access Gateway Enterprise Edition – Part 2
- Configuring NetScaler for Single Sign-on to Claims-Based SharePoint 2010 Web Servers
Closing notes
I’m aware I didn’t include the configuration for the claims based auth to SharePoint scenario (and how we still get SSO), but this is because it’s rather straightfoward. SharePoint, while load balanced with NetScaler, is just configured for Claims based auth, and uses the ADFS server as IDP. The LB vserver on the NetScaler does not perform any authentication. When a user wants to access SharePoint for the first time, he/she authenticates at the ADFS, after which AFDS sets its own session cookie. So when the same user later wants to access XenApp, and gets redirected to ADFS by the NS, ADFS reads the session cookie and performs SSO.
That concludes it for now. While not really easy, it’s definately very awesome, showing the power of Citrix NetScaler once again. Any questions? Use the comments below 🙂

